
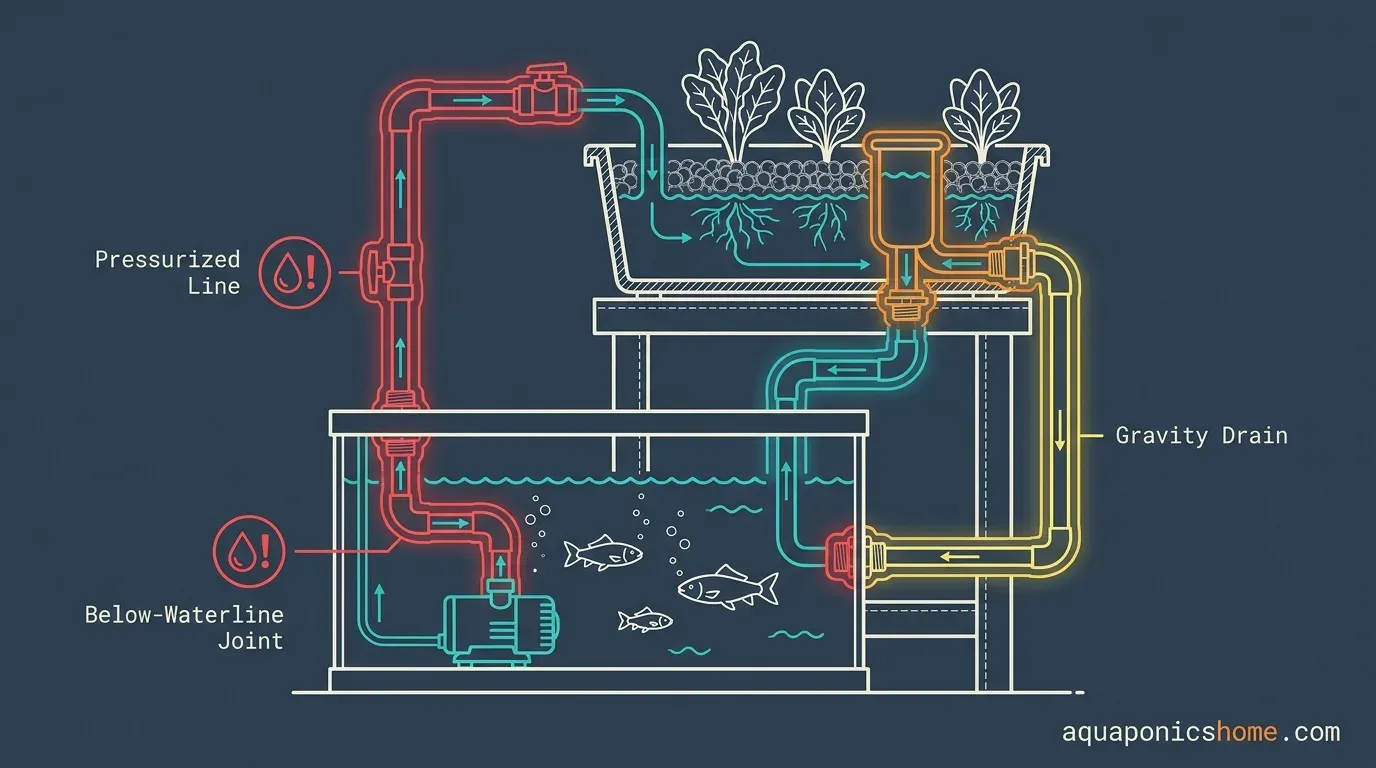
Aquaponics plumbing in a small system is a short loop: a pump pushes water from the fish tank up to the grow bed, and a drain returns it by gravity. Leaks almost always start at a few predictable places: where a pipe passes through a tank or grow bed wall, at threaded and push-together joints, at tubing pushed onto barbed fittings, and at overflows that cannot keep up.
Not every joint matters equally. The ones that matter most are any fitting below the fish tank’s waterline and the pressurized line from the pump, because those can empty the tank.
This guide sorts the joints by what happens when they fail, explains the fittings you will meet, and ends with a plain-water leak test to run before fish or grow media go in.
The Basic Loop, and Why It Shapes Where Leaks Happen
Most small systems have two kinds of plumbing:
- The pressurized side. From the pump to the grow bed. While the pump runs, this line is under pressure, so a loose joint sprays or streams rather than drips.
- The gravity side. From the grow bed back to the fish tank, through a drain fitting in the bottom of the bed and often with a bell siphon or standpipe. Water here only moves because it is falling, so a bad joint tends to seep or drip.
University of Maryland Extension’s build guide How to Build a Low-Cost, Small-Scale Aquaponic System by Andrea Franchini, Jose-Luis Izursa and Neith Little (EM-2023-0698, read 2026-09-27) shows this layout clearly.
A drain connector passes through the bottom of the grow bed: a PVC male connector screwed in from above, a female connector tightened underneath, then short lengths of 1-inch PVC pipe and elbows carrying water back down to the fish tank. That through-the-bottom connection is exactly the kind of joint this article is about.
Rank Your Joints by What Happens When They Fail
A useful question to ask about every joint in your build: if this fails at 3 a.m., how much water leaves the system, and where does it go?
Highest risk: any fitting below the fish tank’s waterline
A hole in the side or bottom of the fish tank, with a bulkhead or tank adapter in it, is only as good as its seal. If it fails, gravity can drain the tank down to the level of the hole. That means lost water on the floor and fish left in too little water, or none.
The safest design avoids this altogether. A submersible pump sitting inside the fish tank, with its pipe going up and over the rim, needs no hole in the tank at all.
If your design does need a fitting below the waterline, treat it as the most important joint in the build: use a proper fitting for the job, inspect it often, and position it where a leak would be seen early.
High risk: the pressurized line from the pump
This is the risk most people miss. If the pump’s outlet pipe comes apart, or the pipe pops off a fitting, the pump keeps running. It will keep pumping water out of the fish tank and onto the floor until the tank level falls below the pump intake.
Ways to reduce it:
- Make pressurized joints secure, either glued or properly threaded, rather than simply pushed together.
- Clamp flexible tubing onto barbed fittings rather than relying on friction alone.
- Set the pump intake height thoughtfully. A pump raised off the tank floor cannot pump the tank below its own intake, which keeps some water for the fish if the return line fails.
Medium risk: the grow bed drain
The drain fitting in the bottom of the grow bed holds back only the water in the bed. A failure here spills the bed’s water, which is serious if the bed sits above a floor or furniture, but it does not drain the fish tank directly, and the pump will keep refilling the bed until you notice.
Lower risk, but not zero: gravity return joints
Joints on the pipe returning water to the tank carry no pressure, so they drip rather than spray. Dry-fitted joints here are sometimes used so parts can be taken apart for cleaning. Check them, because a slow drip onto a floor can go unnoticed for a long time.
The hidden risk: overflow
Not every flood is a leak. A blocked drain, a siphon that stops draining, or roots growing into a pipe can make the grow bed overflow while every fitting is perfect. Our guide to aquaponics leak and overflow protection covers overflow pipes and backup drains.
The Fittings You Will Meet
Bulkhead fittings
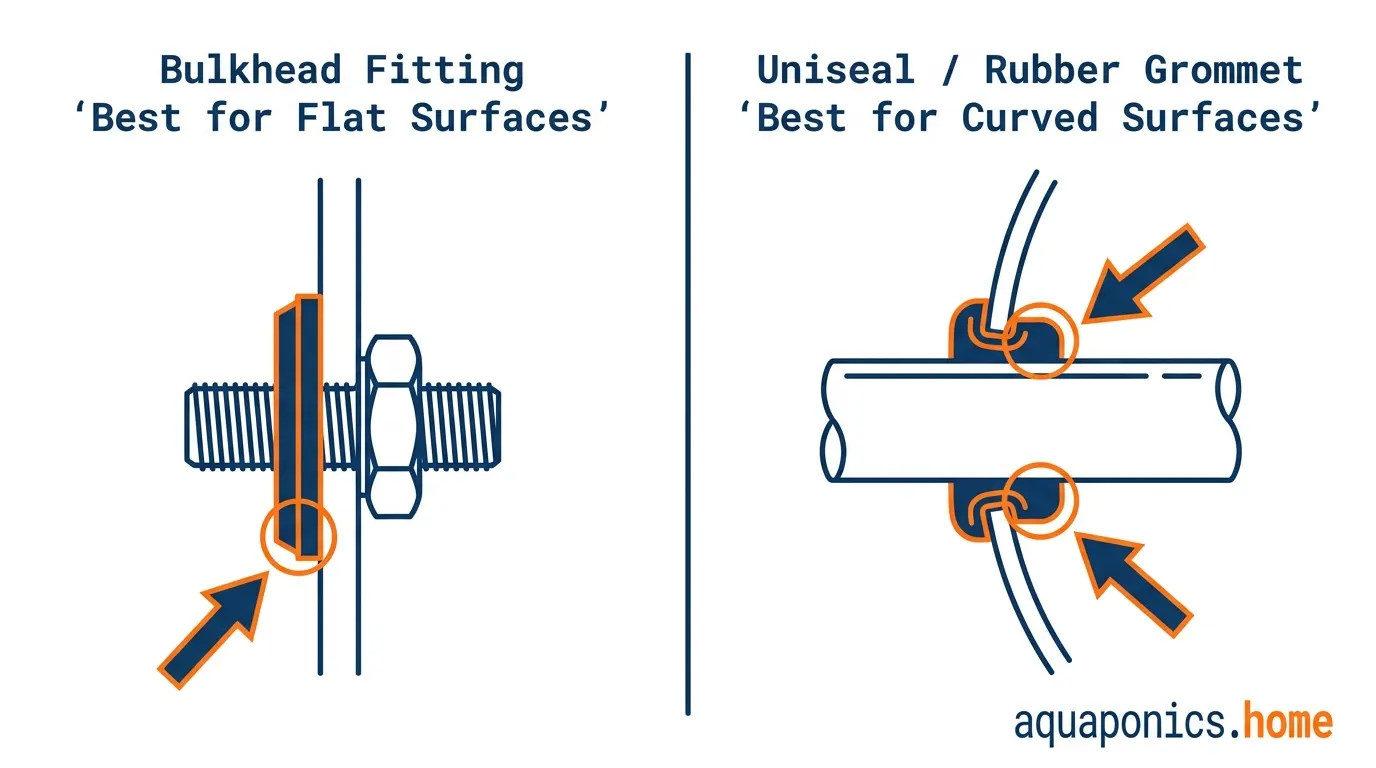
A bulkhead fitting is a threaded tube that passes through a hole in a tank or grow bed wall, with a rubber gasket and a nut that clamp it tight from both sides. It works best on flat surfaces, because the gasket needs to sit evenly. Most leaks at a bulkhead come from:
- A gasket on the wrong side, missing, twisted or damaged.
- A curved surface that stops the gasket sitting flat.
- A nut that is too loose, or overtightened enough to distort the gasket or crack the plastic.
- Rough edges on the hole cutting into the gasket.
Rubber grommet seals (often sold as “uniseals”)
These are thick rubber rings pushed into a hole, with a rigid pipe then pushed through the ring. The rubber squeezes around the pipe to seal it.
They suit curved surfaces such as barrels and buckets, where a bulkhead’s flat gasket struggles. They depend on a correctly sized hole, a clean round pipe with smoothed edges, and the pipe not being bumped or levered once installed.
Threaded adapters and screw-in connectors
The Maryland guide’s grow bed drain uses a male PVC connector from above and a female connector below.
It also includes a practical reminder: the guide notes that “the cap on the grow bed may have loosened during construction,” and says to tighten it with an adjustable wrench before the grow bed goes into its frame. Threads loosen when parts are handled, so check them after assembly, not just during.
Glued versus dry-fitted PVC
Rigid PVC pipe and fittings can be joined with solvent cement, which makes a permanent bond, or pushed together dry.
- Glue pressurized joints and anything you do not need to take apart. Follow the cement maker’s instructions, including drying time, before water goes through.
- Dry fit only where you need to remove parts for cleaning, on low-pressure gravity lines, and check those joints regularly.
Flexible tubing on barbs
Common between small pumps and the first rigid pipe. Push the tubing fully onto the barb and use a clamp on any line under pump pressure.
Materials in contact with the water
Everything the water touches also touches your fish and, eventually, your food.
Choose pipe and fittings sold as suitable for drinking water or for fish, and avoid copper and brass parts in contact with system water, since dissolved copper can harm fish. If you are unsure about a material, ask the supplier or your local extension service before using it.
The Heaviest Object in the Build
A full grow bed is mostly water and wet media, and water is heavy: roughly one kilogram per liter. Put that on a stand above a living space, on a balcony, or above anything that cannot get wet, and a plumbing failure becomes a structural and property problem as well.
The Maryland guide is direct about this for its IBC tote system, saying that once filled with water the tank “will weigh up to 2,330 lbs” and that “the completed system should be placed only on a weight-bearing floor.”
It also advises: “Before adding water and the grow medium to the IBC system, place the system in your preferred location first.” A full system should not be moved.
Before you build:
- Work out the weight of your specific system, including the stand, media and water. Our guide on how heavy an aquaponics system is walks through it.
- If the system will sit on a balcony, an upper floor, a roof, or above a room, the question of whether the floor can carry it is for a qualified structural engineer or your building’s management, not a blog or a guess.
- If you rent, read whether you need to tell your landlord about aquaponics before any water goes in.
- Build the stand for the full weight, on a level surface, so it does not rack or shift and strain the fittings.
Electricity Near the Plumbing
Where there is plumbing there is water, and where there is a pump there is electricity.
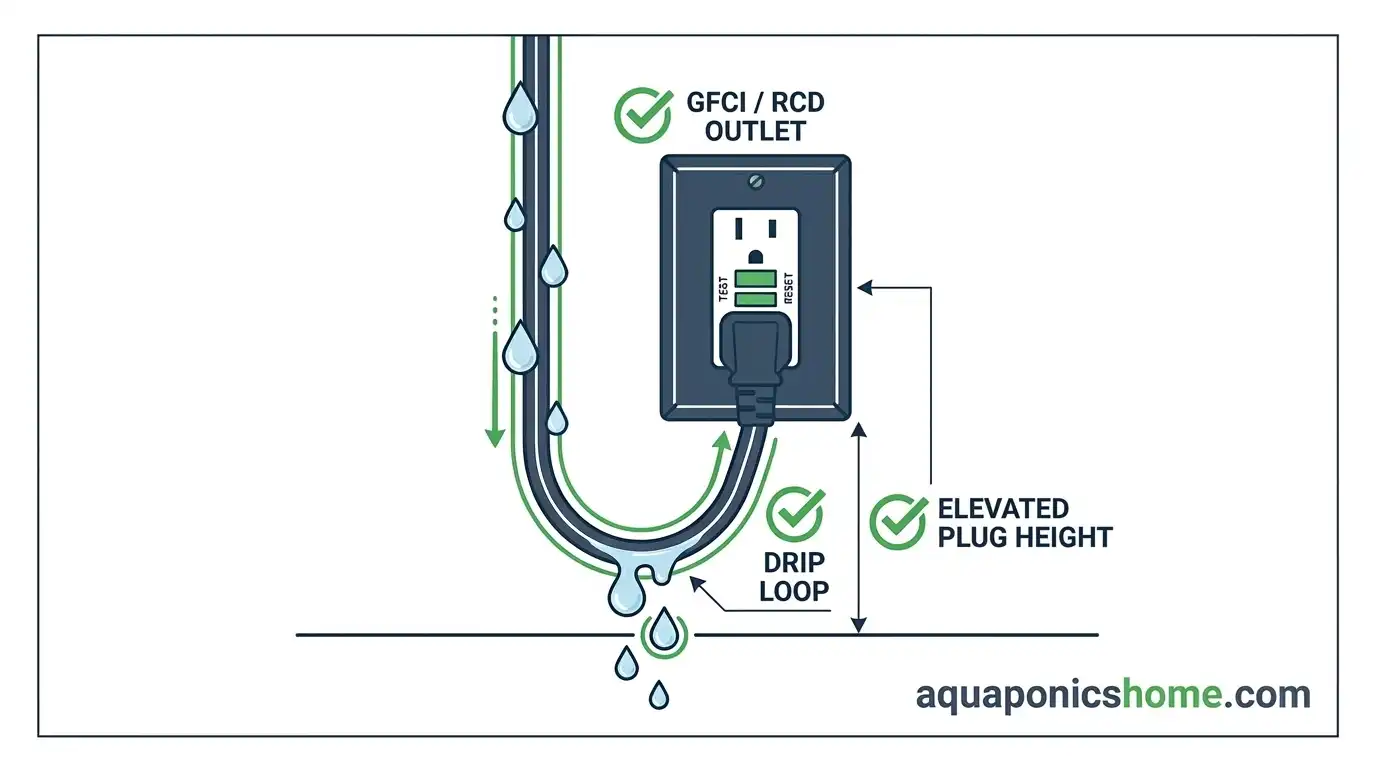
- Plug pumps into a socket protected by a residual current device, called a GFCI in the US and an RCD in the UK and many other countries. It is designed to cut the power when current leaks where it should not, including through water.
- Leave a drip loop: let each power cord dip below the socket before rising to it, so water running down the cord drips off the low point instead of reaching the plug.
- Keep sockets and extension leads above and away from anywhere a leak or overflow could reach.
Stop here if your plan involves new sockets, moving outlets or any fixed wiring. That is work for a licensed electrician, and the rules on what a homeowner may do differ by country.
If water reaches a socket or extension lead, do not touch it or the water around it; switch off the power at the main switch only if you can reach it without standing in water, and otherwise call an electrician.
Leak Test With Plain Water, Before Fish or Media
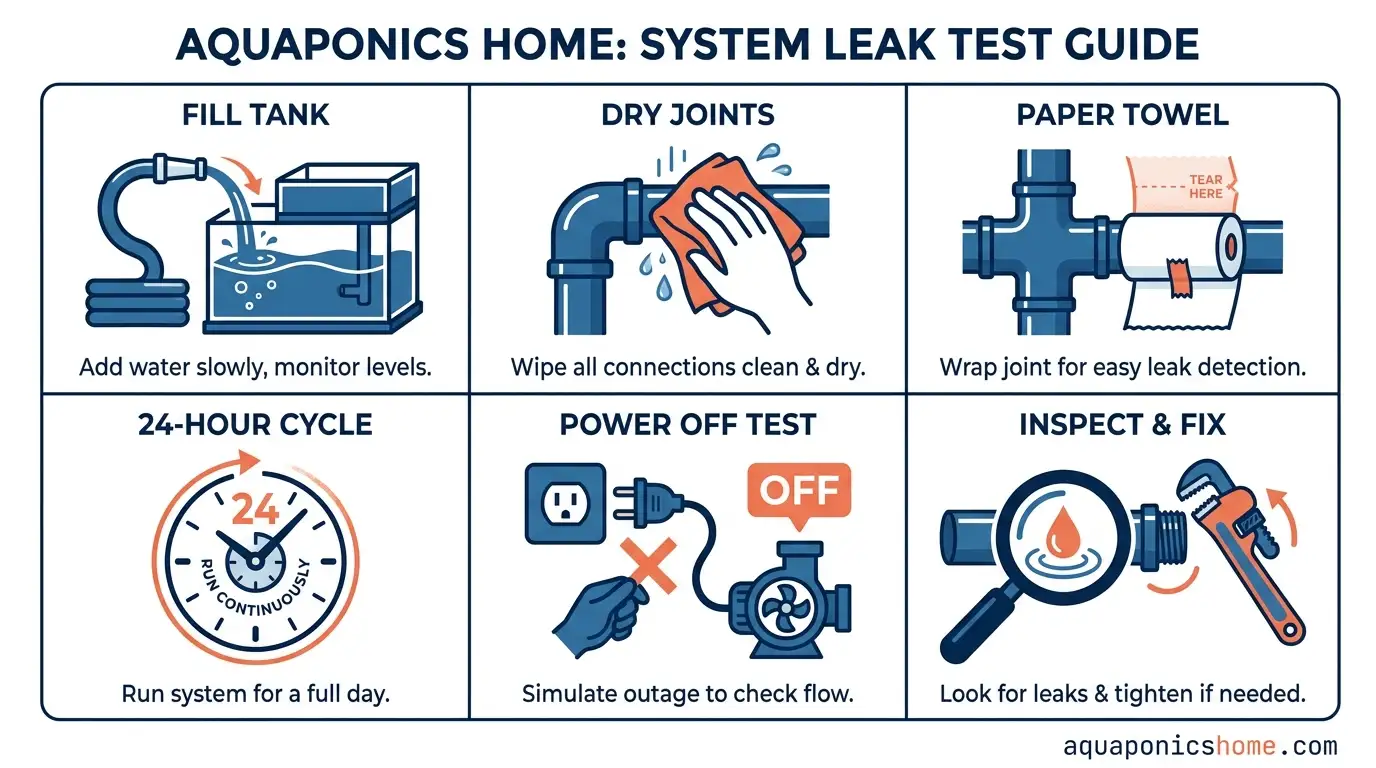
This is the step that saves most floors. Run it after the plumbing is assembled and the system is in its final position, but before grow media and fish go in.
- Fill with plain water only. No media yet, so you can see every joint and the bottom of the grow bed.
- Dry every joint first, then lay paper towel or tissue under each fitting. A damp patch shows a slow leak you would never see on wet plastic.
- Run the pump and let the system cycle for at least a full day, through many fill and drain cycles if you use a siphon.
- Check every joint on both the pressurized and gravity sides, plus the floor under the stand.
- Turn the pump off and watch. Confirm the fish tank can hold all the water that drains back from the grow bed and pipes without overflowing.
- Fix and repeat. Drain down, correct any leak, and test again before moving on.
Once media and fish are in, fixing a joint means draining the bed and disturbing the fish. It is far better to find the problem now. If a leak does appear later, aquaponics leak repair: find the slow leak first covers tracking it down.
FAQ
What plumbing do I need for a small aquaponics system?
A pump with tubing or rigid pipe up to the grow bed, a drain fitting through the bottom of the grow bed, and pipe back to the fish tank, often with a bell siphon or standpipe. Most small builds use PVC pipe and fittings.
Where do aquaponics leaks start?
At through-wall fittings such as bulkheads and rubber grommet seals, at threaded and dry-fitted joints, at tubing on barbed fittings, and at overflows when a drain blocks. Fittings below the fish tank’s waterline and on the pump’s pressurized line carry the most risk.
Bulkhead or uniseal: which should I use?
A bulkhead suits flat surfaces, where its gasket can sit evenly. A rubber grommet seal suits curved surfaces such as barrels and buckets, and needs a rigid, smooth-edged pipe and a correctly sized hole.
Should I glue aquaponics PVC pipes?
Glue joints under pump pressure and anything that does not need to come apart. Dry fitting is sometimes used on low-pressure gravity lines where you want to remove parts for cleaning, but check those joints regularly.
How do I leak test an aquaponics system?
Fill it with plain water before adding media or fish, dry every joint, place paper towel under the fittings, and run the pump for at least a full day. Then switch the pump off to confirm the fish tank can take all the water that drains back.